Work environment
REMARK
In the rapidly evolving IT landscape, it is quite likely that the latest versions (and corresponding screen shots) of the software tools differ from the ones we installed when we wrote this course!
0: PhpStorm
- Ensure that you have an up-to-date version of PhpStorm on your machine
- Installation instructions
- If you do not have a JetBrains account yet
- Make an account at https://www.jetbrains.com/. Use your Thomas More email address!
- You receive a mail with subject "Complete your account registration" to confirm your registration
- Go to https://www.jetbrains.com/student/ and click "Apply Now". Use your Thomas More email address (that you used for your registration).
- You receive a second mail "JetBrains Educational Pack Confirmation" to confirm your application for the educational pack
- You receive a third mail "JetBrains Student License Confirmation" to activate your student license. Now, you can install all software packages that are included in the educational pack/student license.
- We recommend to install the Toolbox App, as it is a handy tool to manage and update all JetBrains software
- If you do not have a JetBrains account yet
1: GIT Bash & Node.js
- Ensure that Node.js, NPM and a terminal (we prefer Git Bash) are installed on your machine
- Install GIT for Windows
- Open a new terminal window ("GIT Bash Here") and check your configuration
$ git --version
git version 2.23.0.windows.1
1
2
2
- Install the latest version of Node.js
- Open a new terminal window and check your configuration
$ node -v && npm -v
v12.9.0
6.10.2
1
2
3
2
3
2: PHP 7.3.x
- Download PHP 7.3.xx for Windows (VC15 x64 Thread Safe)

- Extract the zip-file in the root of your C-drive and rename the folder to: C:\PHP73
- Open Omgevingsvariabelen van het systeem bewerken
- Click Omgevingsvariabelen
- Choose (under Systeemvariabelen) the variable Path, and click on Bewerken...
- Add C:\PHP73

- Open a new terminal window and check your configuration
$ php -v
PHP 7.3.5 (cli) (built: May  1 2019 13:17:17) ( ZTS MSVC15 (Visual C++ 2017) x64 )
Copyright (c) 1997-2018 The PHP Group
Zend Engine v3.3.3, Copyright (c) 1998-2018 Zend Technologies
1
2
3
4
2
3
4
- Duplicate the file C:\PHP73\php.ini-development and rename the file to php.ini
- Open php.ini in an editor and remove the
;(semicolon) in front of the most common extensionsextension_dir = "ext"extension=curlextension=fileinfoextension=gd2extension=mbstringextension=odbcextension=opensslextension=pdo_mysqlextension=sockets
- Increase the memory limit (from 128M) to 512M
memory_limit = 512M
- On the desktop, create a new folder phptest containing a new file index.php with the following content
<?php
phpinfo();
1
2
2
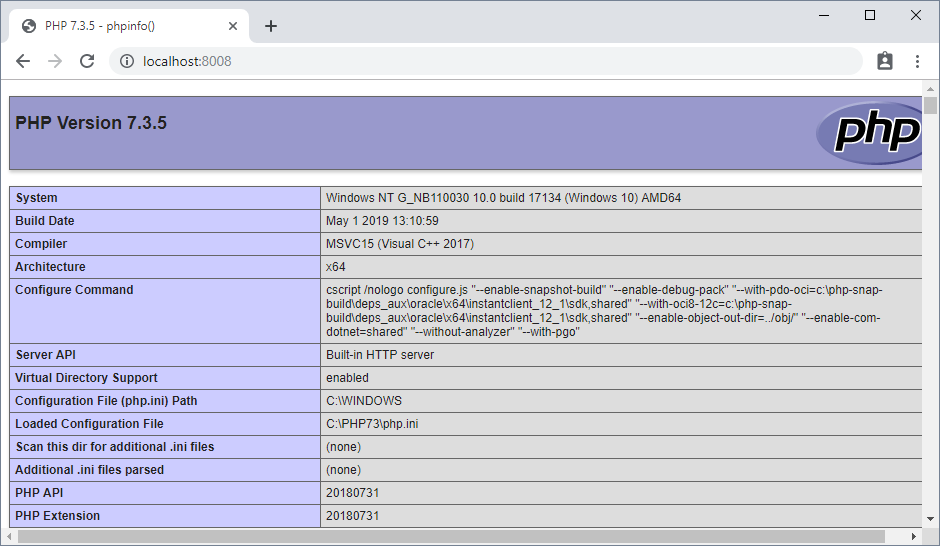
- Open a new terminal window inside the phptest folder and start PHP's local test server
$ php -S localhost:8008
1
- Open http://localhost:8008 in a browser
3: Homestead
- Laravel Homestead is an official, pre-packaged Vagrant box that provides you a wonderful development environment
- Homestead lets you run PHP, a web server, and other server software inside VirtualBox
Install VirtualBox & Vagrant
- Enable Hardware virtualisation in your BIOS (https://www.youtube.com/watch?v=mFJYpT7L5ag)
- Install VirtualBox 6.x
WARNING
Be sure to install version 6.x of VirtualBox, because otherwise Homestead will not work!
- Install Vagrant
- Create, at the root of your C-drive, two new folders
- C:\vagrant (where you save the Vagrant box)
- C:\sites_laravel (where you store your websites)
Install Homestead
- Open Git Bash in the C:\vagrant folder and execute the following command(s)
$ vagrant box add laravel/homestead
1
$ git clone https://github.com/laravel/homestead.git homestead
$ cd homestead
$ git checkout release
$ bash init.sh
$ vagrant up
1
2
3
4
5
2
3
4
5
- In the C:\vagrant\homestead folder, open the Homestead.yaml file and adjust the configuration (use a slash instead of a backslash!)
folders:
    - map: C:/sites_laravel
      to: /home/vagrant/code
sites:
    - map: homestead.test
      to: /home/vagrant/code
1
2
3
4
5
6
2
3
4
5
6
- Restart the server
vagrant halt
vagrant up --provision
1
2
2
- Open (as administrator!) the file C:\Windows\System32\drivers\etc\hosts and add a new domain
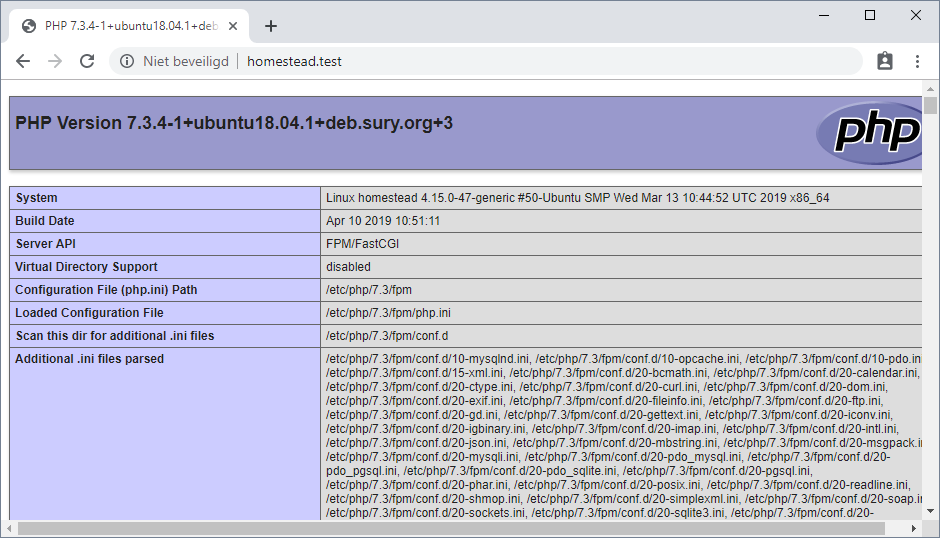
192.168.10.10 homestead.test - Create inside the C:\sites_laravel folder a file index.php with the content
<?php echo phpinfo(); - Open http://homestead.test in a browser
COMMON ERROR MESSAGES AND SOLUTIONS
- Check your Homestead.yaml (or Homestead.json) file, the path to your private key does not exist.
- Go to C:/Users/user_name/ and open Git Bash
- Execute the commands
mkdir .ssh(if the folder C:/Users/user_name/.ssh does not exist) andtouch .ssh/id_rsa(to create an empty private key file in this folder)
Homestead.bat (optional)
- From this batch file you can easily perform the most frequently used actions
- Create a new file homestead.bat (on your desktop)
- Open the file and paste the code below
- Double click the file to run the script
@echo off
title Vagrant - Homestead

C:
cd C:\vagrant\homestead
:: uncomment (remove ::) the two lines below if the folder is on a different drive. E.g. D-drive
:: D:
:: cd D:\vagrant\homestead

:home
cls
echo.
echo Select a task:
echo =============
echo.
echo 1) vagrant up               (Homestead.yaml hasn't been changed)
echo 2) vagrant up --provision   (Homestead.yaml has changed)
echo 3) vagrant halt             (shut down Homestead)
echo 4) vagrant destroy          (destroy Homestead and remove it from VirtualBox)
echo 5) vagrant box update       (Update Homestead to the latest version)
echo 6) vagrant ssh              (Type 'exit' or Ctrl+d to exit, default password: vagrant)
echo 0) Exit
echo.

set /p action=Type option:

if "%action%"=="1" goto up
if "%action%"=="2" goto provision
if "%action%"=="3" goto halt
if "%action%"=="4" goto confirmDestroy
if "%action%"=="5" goto confirmUpdate
if "%action%"=="6" goto ssh
if "%action%"=="0" exit
goto home

:up
@echo on
vagrant up
@echo off
pause
goto home

:provision
@echo on
vagrant halt & vagrant up --provision
@echo off
pause
goto home

:halt
@echo on
vagrant halt
@echo off
pause
goto home


:confirmDestroy
cls
echo.
echo This action destroys Homestead and remove it from VirtualBox!
echo =============================================================
echo.
echo Before you execute this command, it is best to make a backup
echo of all your databases with phpMyAdmin.
echo - http://homestead.test/phpMyAdmin
echo - http://phpMyAdmin.test
echo.
set /P kill=Are you sure you want to destroy Homestead [Y/N]?
if /I "%kill%"=="Y" ( goto destroy ) else ( goto home)

:destroy
@echo on
vagrant up & vagrant destroy -f
@echo off
pause
goto home

:confirmUpdate
cls
echo.
echo This action destroys Homestead and update it to the latest version
echo ==================================================================
echo.
echo Before you execute this command, it is best to make a backup
echo of all your databases with phpMyAdmin.
echo - http://homestead.test/phpMyAdmin
echo - http://phpMyAdmin.test
echo.
set /P update=Are you sure you want to destroy and update Homestead [Y/N]?
if /I "%update%"=="Y" ( goto update ) else ( goto home)

:update
@echo on
vagrant box update & vagrant destroy -f & vagrant up
@echo off
pause
goto home

:ssh
@echo on
vagrant ssh
@echo off
pause
goto home
1
2
3
4
5
6
7
8
9
10
11
12
13
14
15
16
17
18
19
20
21
22
23
24
25
26
27
28
29
30
31
32
33
34
35
36
37
38
39
40
41
42
43
44
45
46
47
48
49
50
51
52
53
54
55
56
57
58
59
60
61
62
63
64
65
66
67
68
69
70
71
72
73
74
75
76
77
78
79
80
81
82
83
84
85
86
87
88
89
90
91
92
93
94
95
96
97
98
99
100
101
102
103
104
105
4: Composer
- Composer is a dependency Manager for PHP
- Download and install Composer: https://getcomposer.org/Composer-Setup.exe
- Open a new terminal window and check your configuration
$ composer -v
     ______
    / ____/___  ____ ___  ____  ____  ________  _____
   / /   / __ \/ __ `__ \/ __ \/ __ \/ ___/ _ \/ ___/
  / /___/ /_/ / / / / / / /_/ / /_/ (__  )  __/ /
  \____/\____/_/ /_/ /_/ .___/\____/____/\___/_/
                      /_/
  Composer version 1.8.5 2019-04-09 17:46:47
1
2
3
4
5
6
7
8
2
3
4
5
6
7
8
TIP
You can update Composer with: $ composer self-update
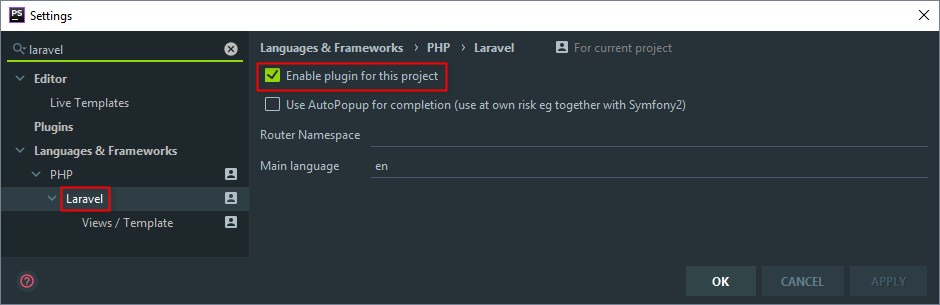
5: PhpStorm plugins
- Laravel support is provided by means of the Laravel plugin and the Laravel IDE helper
- Go to menu File -> Settings -> Plugins
- Search for Laravel
- Install Laravel and Laravel Snippets

- Restart PhpStorm
WARNING
You have to enable the Laravel plugin for every new project!
6: PhpMyAdmin
- phpMyAdmin is a free software tool written in PHP, intended to handle the administration of MySQL over the Web
Installation
- Download phpMyAdmin
- Unzip the file at the root of C:\sites_laravel and rename the folder to phpMyAdmin (C:\sites_laravel\phpMyAdmin)
- phpMyAdmin is now available at http://homestead.test/phpMyAdmin/
- Login with name homestead and password secret
Update timezone
- If you install a fresh Laravel and create your app, you may notice that all created_at and other timestamp fields in the database are being saved in UTC timezone
- Open the Laravel project file config/app.php and look for this entry
'timezone' => 'UTC', - Change the default timezone (UTC) to your local timezone, i.e. Europe/Brussels
/*
|--------------------------------------------------------------------------
| Application Timezone
|--------------------------------------------------------------------------
|
| Here you may specify the default timezone for your application, which
| will be used by the PHP date and date-time functions. We have gone
| ahead and set this to a sensible default for you out of the box.
|
*/

'timezone' => 'Europe/Brussels',
1
2
3
4
5
6
7
8
9
10
11
12
2
3
4
5
6
7
8
9
10
11
12
Set hostname (optional)
- Open C:\vagrant\homestead\Homestead.yaml and add, under sites, a new path to phpMyAdmin
sites:
    - map: homestead.test
      to: /home/vagrant/code
    - map: phpmyadmin.test
      to: /home/vagrant/code/phpMyAdmin
1
2
3
4
5
2
3
4
5
- Open the file C:\Windows\System32\drivers\etc\hosts (as administrator!) and add a new domain
192.168.10.10 phpmyadmin.test - phpMyAdmin is also available at http://phpmyadmin.test
Extend session (optional)
- After 24 minutes of inactivity, the phpMyAdmin session ends and you have to login again
- If you wish, you can extend the duration of the session
- Go to PHP folder: C:\sites_laravel\phpMyAdmin
- Make a copy of config.sample.inc.php and rename it to config.inc.php
- Open config.inc.php
- Give the variable
$cfg['blowfish_secret']a random string of 32 characters - Then add five extra lines of code
<?php
/**
 * This is needed for cookie based authentication to encrypt password in
 * cookie. Needs to be 32 chars long.
 */
$cfg['blowfish_secret'] = '0123456789-0123456789-0123456789'; /* YOU MUST FILL IN THIS FOR COOKIE AUTH! */

$sessionValidity = 3600 * 24 * 365; // one year
$cfg['LoginCookieValidity'] = $sessionValidity;
$cfg['LoginCookieStore'] = $sessionValidity;
ini_set('session.gc_maxlifetime', $sessionValidity);
$cfg['CheckConfigurationPermissions'] = false;
1
2
3
4
5
6
7
8
9
10
11
12
2
3
4
5
6
7
8
9
10
11
12
Auto login (optional)
- If you want to go one step further, you can make sure that you are automatically logged in
- Open config.inc.php
- Find the variable
$cfg['Servers'][$i]['auth_type']and change the variable value from'cookie'to'config' - Add two extra lines of code
$cfg['Servers'][$i]['auth_type'] = 'config';    // Change from 'cookie' to 'config'

$cfg['Servers'][$i]['user'] = 'homestead';
$cfg['Servers'][$i]['password'] = 'secret';
1
2
3
4
2
3
4