Laravel Mix
- Laravel Mix provides a fluent API for defining Webpack build steps for your Laravel application (using several common CSS and JavaScript pre-processors and live preview with Browsersync)
Frontend scaffolding
- While Laravel does not dictate which JavaScript or CSS pre-processors to use, it does provide a basic starting point for Bootstrap, React and/or Vue
- The frontend scaffolding provided by Laravel is located in the Composer package
laravel/ui- Open a terminal and install the package:
composer require laravel/ui:^2.4
- Open a terminal and install the package:
- Next, you can install the basic Bootstrap frontend scaffolding (the login scaffolding comes later in this course):
php artisan ui bootstrap
REMARK
For further reference, all ui artisan commands to install frontend scaffolding for Bootstrap, Vue and React, both without and with login/registration functionality, are listed below
// Generate basic frontend scaffolding
php artisan ui bootstrap
php artisan ui vue
php artisan ui react

// Generate login/registration scaffolding
php artisan ui bootstrap --auth
php artisan ui vue --auth
php artisan ui react --auth
2
3
4
5
6
7
8
9
Install Laravel Mix
- Open a terminal and execute the command
npm installto install the necessary Node modules - Open the Mix config file webpack.mix.js and add Browsersync at the end of the file
mix.js('resources/js/app.js', 'public/js')
   .sass('resources/sass/app.scss', 'public/css');

mix.browserSync({
    proxy: 'vinyl_shop.test',
    port: 3000
});
2
3
4
5
6
7
- Open a new terminal window and execute
npm install browser-sync browser-sync-webpack-plugin@2.0.1 --save-dev --production=false --legacy-peer-deps
to install some additional Node packages - Open a new terminal window and execute
npm run watch(or click on thewatchtask from the npm tab)- This command runs a NPM script that launches a development web server which can be reached via http://localhost:3000 and which proxies our domain http://vinyl_shop.test. The script "watches" changes in relevant files, and if a change is detected, the tasks listed in webpack.mix.js are executed
- The necessary JavaScript files are bundled and the resulting file is copied into the public/js folder (line 1)
- The Sass/SCSS files are compiled and the resulting CSS file is copied into the public/css folder (line 2)
- The page gets reloaded via Browsersync (lines 4-7)
- This command runs a NPM script that launches a development web server which can be reached via http://localhost:3000 and which proxies our domain http://vinyl_shop.test. The script "watches" changes in relevant files, and if a change is detected, the tasks listed in webpack.mix.js are executed
- Open http://localhost:3000 in a browser and edit one of the Blade pages to see Browsersync in action
REMARKS
- The Sass compilation of the Bootstrap source code generates a lot of (deprecation) warnings stating that 'Using / for division is deprecated and will be removed in Dart Sass 2.0.0.'
To suppress these warnings you should downgrade Sass to version 1.32.13 withnpm install sass@1.32.13 --save-dev - If you use a CDN to link your CSS and JavaScript frameworks, you can remove (or comment out) the first two lines in webpack.mix.js, and skip the remainder of this section. Your Mix experience will be limited to Browsersync.
- Add an additional line to the first mix statement if you would like to generate (Javascript and CSS) source maps:
   mix.js('resources/js/app.js', 'public/js')
      .sass('resources/sass/app.scss', 'public/css')
      .sourceMaps(true, 'source-map');
2
3
Update the template
- After you run
npm run watchthere will be two extra files in the public folder- public/css/app.css: this file contains the full Bootstrap CSS
- public/js/app.js: this file contains all the JavaScript code (jquery.js, and bootstrap.bundle.js)
- Link these files in the template resources/views/layouts/template.blade.php using the Laravel
mix()helper function- Replace the three CDN links (one CSS and two JavaScript links) in our template with the two links to these files
<!doctype html>
<html lang="en">
<head>
    <meta charset="UTF-8">
    <meta name="viewport" content="width=device-width, initial-scale=1.0">
    <link rel="stylesheet" href="{{ mix('css/app.css') }}">
    <title>@yield('title', 'The Vinyl Shop')</title>
    @include('shared.icons')
</head>
<body>
    @include('shared.navigation')
    <main class="container mt-3">
        @yield('main', 'Page under construction...')
    </main>
    @include('shared.footer')
    <script src="{{ mix('js/app.js') }}"></script>
</body>
</html>
2
3
4
5
6
7
8
9
10
11
12
13
14
15
16
17
18
WARNINGS
- From now on you will program only in the SCSS and JavaScript files within the folders resources/js and resources/sass
- Make sure that the
npm run watchscript is running, otherwise your changes will not be passed to the public folder (and thus, will not be visible in the browser)
Customize Bootstrap with SCSS
- The folder resources/sass contains two files
- The main file app.scss that will be automatically compiled to public/css/app.css
- A partial _variables.scss
- Imported in app.scss BEFORE the Bootstrap import
- Can be used to overwrite Bootstrap variables or to add your own variables
- Open resources/sass/app.scss
- Import Font Awesome via a CDN link
// Fonts
@import url('https://fonts.googleapis.com/css?family=Nunito');
@import url('https://cdnjs.cloudflare.com/ajax/libs/font-awesome/5.15.4/css/all.min.css');

// Variables
@import 'variables';

// Bootstrap
@import '~bootstrap/scss/bootstrap';
2
3
4
5
6
7
8
9
main element), you can add it AFTER the Bootstrap import// Fonts
@import url('https://fonts.googleapis.com/css?family=Nunito');
@import url('https://cdnjs.cloudflare.com/ajax/libs/font-awesome/5.15.4/css/all.min.css');
// Variables
@import 'variables';
// Bootstrap
@import '~bootstrap/scss/bootstrap';
//Custom code
main {
  min-height: 500px;
}
2
3
4
5
6
7
8
9
10
11
12
13
14
TIP
If you have a lot of custom code, it is better to add some extra partials to make the code more readable
- Create a new file resources/sass/_main.scss and add this code
main {
min-height: 500px;
}
2
3
- Import _main.scss in app.scss AFTER the Bootstrap import
// Fonts
@import url('https://fonts.googleapis.com/css?family=Nunito');
@import url('https://cdnjs.cloudflare.com/ajax/libs/font-awesome/5.15.4/css/all.min.css');

// Variables
@import 'variables';

// Bootstrap
@import '~bootstrap/scss/bootstrap';

// Custom code
@import 'main';
2
3
4
5
6
7
8
9
10
11
12
Add additional JavaScript
- If you need extra JavaScript that applies to every page (later in this course), it is best practice to create a global JavaScript file that you can incorporate into the automation immediately
- Create a new file resources/js/vinylShop.js
- Add a simple console log message to check if it's visible inside the browser console
let VinylShop = (function () {

    function hello() {
        console.log('The Vinyl Shop JavaScript works! 🙂');
    }

    return {
        hello: hello    // publicly available as: VinylShop.hello()
    };
})();

export default VinylShop;
2
3
4
5
6
7
8
9
10
11
12
- Open resources/js/app.js and import vinylShop.js
require('./bootstrap');

// Make 'VinylShop' accessible inside the HTML pages
import VinylShop from "./vinylShop";
window.VinylShop = VinylShop;
// Run the hello() function
VinylShop.hello();
2
3
4
5
6
7
REMARK
The code above is based on the JavaScript revealing module pattern. We refer to the following introductions for the interested reader:
- Mastering the Module Pattern
- Revealing Module Pattern Javascript Tutorial (YouTube tutorial)
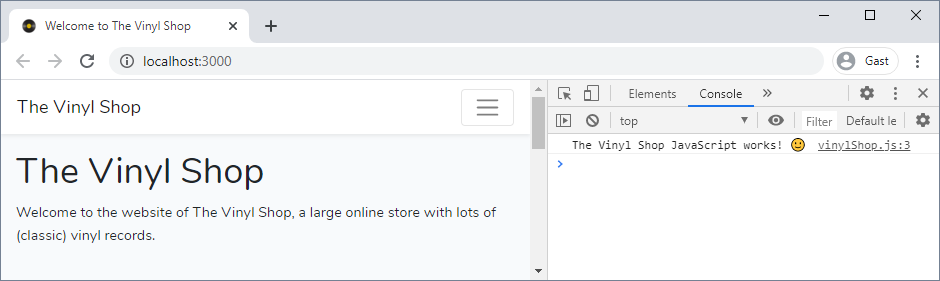
- Visit http://localhost:3000 and check whether the console contains the log message
Versioning (optional)
- Look at the source code inside the browser (
F12orCtrl+U) - The CSS link (for example) looks like this:
<link rel="stylesheet" href="/css/app.css" />
- Add the following code to webpack.mix.js in order to enable versioning (or cache busting): each time your code changes, a new hashed query string file will be generated
mix.version();
REMARK
You can either add the line above separately in your webpack.mix.js file, or you can add it alternatively like this:
   mix.js('resources/js/app.js', 'public/js')
      .sass('resources/sass/app.scss', 'public/css')
      .sourceMaps(true, 'source-map')
      .version();
2
3
4
- Stop the watch script with
Crtl+Cand restart it withnpm run watch - Look at the source code to see the extra hash at the end of the file
<link rel="stylesheet" href="/css/app.css?id=e0a0cd9aee98968ed025" />
Disable notifications (optional)
- If you don't like the pop-up (and beep) every time Mix compiles a new version, you can disable this by adding this line to webpack.mix.js
mix.disableNotifications();
- Stop the watch script with
Crtl+Cand restart it withnpm run watch
Recompile for production
WARNING
The scripts compiled with npm run watch are NOT production ready! They are not minimized and still contain a lot of overhead code.
Every time you put a new version of your CSS or JavaScript file online, first optimize your code with the command npm run prod.
- Stop the watch script with
Crtl+C - Build a minimized version of app.css and app.js with the command
npm run prod - Upload the files to your hosting
- Start the watch script (again) with the command
npm run watch